Monday, May 28, 2012

Homemade Mozzarella

Playing with cheese-making is pretty fun.  Recently, I've been snagging raw cow's milk from a friend's dairy farm, since making mozzarella from supermarket milk is tough... it's pasteurized at a higher temperature and isn't anywhere near as fresh.  We've succeeded with supermarket milk, but the fresher it is, the better.

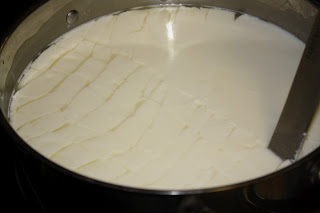
Checking for clear separation between the curds and whey
Cutting the curd before reheating
Unfortunately, I didn't have an extra hand to take pictures with during the stretching and forming steps. It's a learning process that I certainly haven't mastered yet.  The joy is in the experimentation, the minor successes, and the tasting of the best-so-far.

Sunday, March 25, 2012

Ricotta and Calzones

Making things from scratch "ruins" us for the store bought version more often than not.  This experiment was no exception.

We got the necessary gear to make our own homemade mozzarella and ricotta online.   It's actually very easy to make ricotta.  The recipe said to hang it to drain, and we rigged this set up with kitchen twine, butter muslin, a carabiner and an s-hook over a bowl.  Included in the kit is a 30 minute recipe, plus draining time, but completely reasonable to do while the dough is rising.  All it takes is 1 gallon of milk, 1 tsp. citric acid, and 1 tsp. cheese salt.  Really!  You don't need to be a master cook to be able to do this.

Hanging ricotta to drain 
A steady drip

Drained ricotta

Closing up the calzones

Sealing the calzones with a "pico" I learned making empanadas in Bolivia

Baked to golden and delicious

The filling is the perfect consistency, not runny like with store bought ricotta
While we love our weekly Friday night pizza, we thoroughly enjoyed a slight change of pace.  I still made the same pizza dough, the same tomato sauce for dipping, but this time I mixed the ricotta with mozzarella, parmesan, and two of our favorites (pepperoni and pesto/spinach).

For dipping, I made one change to the marinara.  I still let the garlic, pepper flakes, and basil cook in the olive oil, then remove them.  But I add tomato paste to the oil before adding the canned tomatoes.  I let the tomato paste cook in the oil, turning the oil red, then add the tomatoes.  If you use crushed tomatoes, you can skip the blending step.

Calzones

1 recipe pizza dough 
2 cups ricotta
1 cup shredded part skim mozzarella (fresh mozzarella is too moist for this recipe)
1 cup grated parmesan
1 cup filling of your choice (I always make 2 different kinds, dividing the cheeses in half)
salt and pepper to taste

My favorite filling is:  finely chopped spinach (cook it down and drain it well) mixed with a few tablespoons of pesto.  Yum!

Preheat oven to 350.  Roll out half of the dough with a rolling pin on a lightly floured counter.  If the dough is not retaining its shape, let it rest under a kitchen towel for 10 minutes or so.  Fill with half of the filling mixture.  Fold the dough over the filling, and seal closed with a moist fingertip.  Then you may crimp it to seal (just make sure it's not going to split open in the oven).  Repeat with the other half of dough and filling.  Bake on a baking sheet for 35 minutes or until golden and delicious.  Let it cool for a few minutes to help keep the cheese from oozing out.  Cut with a serrated knife.  Serve with warm tomato sauce.


Saturday, March 17, 2012

A New Approach


I'd like to try a new approach to updating this blog.  I've already posted so many of my favorites, and sometimes forget what is already on the blog.  I've also been a little less creative recently with a 4 month old baby who is still not consistently sleeping through the night.... so I think I'll post some highlights of our week's menu with links (as appropriate) to my posts of those recipes and include any new ones.

This past week we enjoyed:

1. Panko Breaded Tilapia
2. 3 non-traditional pizzas:
      Barbecue sauce, turkey and cheddar
      Refried Beans and cheddar topped with corn salsa and sour cream

      Peanut sauce (see below) with basmati rice, grated carrots and snow peas
3. Cheeseburgers and mashed potatoes
4. Grilled cheese on homemade rye bread with a fried egg on top
5. Hummus and homemade pita bread (to take to a potluck) 

Of course, these don't include the veggie sides, which this week were often simple salads or frozen veggies that I threw in the microwave.

I'm also going to try to remember to take pictures sometimes to include.  I guess I'll start with that next week since I completely forgot this past week.


Peanut Sauce

This is something I completely made up and I'm guessing on the quantities, and I'm sure it could be made a variety of ways.

2 tablespoons Peanut Butter
2 cloves garlic
1 inch piece of fresh ginger- grated
1 teaspoon soy sauce
1/2 teaspoon fish sauce
maybe a few drops of water

I start with the garlic in a tiny food processor, and then add the remaining ingredients.  This makes a really thick paste which is fine for the pizza application, but if you're using it as a sauce (like for stir-fry) I recommend thinning it with coconut milk.  You could also add honey, sriracha, scallions or even pre-made hoisin sauce.  

Sunday, January 29, 2012

Favorite resources

I recently found myself explaining my love of cooking to a friend.  Making things from scratch can be fun, less expensive, and healthier.  It can also be a huge time commitment.  I started making a lot more "from scratch" when I became a stay at home mom.  My firstborn was wonderful at taking very long naps.  I was in the house, couldn't leave, and had time on my hands.  I also had a smaller budget since I had stopped working.  I learned to open the pantry door, do a little research, and make something fabulous for dinner.   As our family has grown, my idle time seems to be disappearing, and my budget ever-shrinking, but it's a huge blessing to have a few things up my sleeve that I know I can fall back on.

So many of the things I cook are not my original recipes.  Most of the ones I use regularly I have made my own over time.  Sometimes, though, there are recipes that cannot be improved upon.

My most favorite recipes come from:
1.  Cooks Illustrated 
      We have a subscription for online.  We use it.  My only complaint about this (and it doesn't apply to all recipes is that they can take forever.  We joke that the first step of their pumpkin pie recipe should have said, "Take a pumpkin seed, plant it in fertile soil, and water."  It was, however, the best pumpkin pie I've ever eaten.

2.  How to Cook Everything by Mark Bittman
      When we started getting a farm share a few years ago with produce that was completely new to us, this was the best resource to get us started.  He also wrote Best Recipes in the World, which is a great companion to the standby.

3.  Food Network
    As you can imagine, loving food like we do, we have seen our fair share of food TV.  I think there are wonderful recipes from food network, some are better than others... and some chefs have strengths in certain areas.  When I was looking for a good scone recipe, I thought Ina Garten would be a good bet.  She was!  When I wanted to make fresh pasta from scratch, I consulted Anne Burrell.  She also made the most amazing focaccia.  I try to keep in mind what any one chef is known for, and when I'm looking for a recipe in that area, I'll select one from that chef.  Bobby Flay= Southwestern
Paula Deen= southern, etc.  If you don't know where else to start, Alton Brown has put in tons of research into his recipes.  He also writes them like a scientist, and less like a cook.

4.  The Bread Bible by Rose Levy Beranbaum
    I love my basic boule recipe, but when now that I can make it with my eyes closed, I'm ready for bigger adventures to see if I can make something even better.  I got book for Christmas, and my husband has already made a homemade sourdough starter with her recipe.  This book takes a little getting used to, as she explains the many options of how to make something (by hand, in a stand mixer) and explains how to use special equipment AND how to make due without it.  Sometimes it takes a few times of reading it through to know which steps might apply to you with your chosen method and equipment, but it's worth it.  She's done so much of the trial and error for you.


Granola

I've made this recipe for several friends, who often want the recipe.  I've finally decided that it should probably go on this blog.  The world might just be a better place with this recipe in more hands.  This recipe is not difficult and is fun to do with kids (at least combining the ingredients), but does require quite a bit of patience.  One batch of granola makes 20 cups, and toasting that much without burning it is the hardest part of this recipe.

Granola
Makes 20 cups

10 cups rolled oats
3 cups chopped nuts (almonds, pecans, walnuts)
1 cup raw sesame seeds (these can end up in the bottom of the dregs of the container, if you prefer, use less and add pumpkin seeds)
2 cups raw sunflower seeds, rinsed
1/2 pound shredded coconut (unsweetened is better, but use what you find)
1 cup wheat germ

1 1/2 cups water
1 1/2 cups canola oil
1/2 cup molasses
1/2 cup honey
1 1/2 cups brown sugar
1 1/2 tsp. salt
2 tsp. cinnamon
3 tsp. vanilla

Preheat oven to 300.

Combine oats, nuts, sesame seeds (and optional pumpkin seeds), sunflower seeds, coconut, and wheat germ in a huge bowl (or 2 large bowls).

Combine water, oil, molasses, honey, brown sugar, salt, cinnamon and vanilla in a small saucepan over medium low heat.  Warm this until the sugar dissolves, stirring frequently.  Do NOT boil this.... you aren't trying to make caramel.  Once dissolved, pour this over the dry ingredients, stirring to coat thoroughly.
Spread a thin layer of the granola in several parchment lined rimmed baking dishes.  Check after 12 minutes, stir, then rotate baking dishes in the oven.  I check and stir the granola about every 6 minutes until it starts to dry out, darken slightly, and smell delicious.  This is the step when you can end up burning it... so pay close attention.  You will not be able to toast all of this recipe at once, but should be able to do so in 2 rounds.

Store in air tight containers for up to 6 months.  Enjoy on yogurt with fruit, by the handful, or on ice cream (yum!).

Saturday, January 7, 2012

Crock Pot BBQ

Again, for my big sister's new crock pot.  This one benefits from cooking all day long on low.  I'm famous for starting something that could be really easy (like this recipe) and turning it into a huge project. This recipe is so incredibly hands-off that I almost always make homemade rolls to eat it on, homemade BBQ sauce, AND cole slaw from scratch too.  Part of that is that I usually have all the ingredients in the house, so it seems easier to make it myself than to load all the kids in the car and head to the store.  If you want those recipes too, just post a comment.

Crock Pot BBQ

1 Pork Loin or Pork Butt
salt
pepper
generous 1/2 cup apple cider vinegar
2-3 Tablespoons brown sugar
red pepper flakes
1 Tbsp. dry mustard
a dash liquid smoke

Season the meat, put it in the crock pot, add the remaining ingredients.  Cook on low all day.  If you're home about halfway through the day, turn the meat over.  Pull apart with 2 forks (or just with tongs).  Enjoy!


Yogurt

This post is for my other sister who just got a crock pot and called to ask what I like to make in mine.  Admittedly, I don't use my crock pot as much as I should, but this is a favorite.

Yes, you can make your own yogurt.  I was surprised by how easy this is to make, and how much cheaper it is than supermarket yogurt, and especially greek yogurt.   I've made all of our yogurt for months now, and haven't had to buy any.

Crockpot Yogurt
8 cups milk (don't use ultra-pasteurized, I use 2%)
1/2 cup plain yogurt
a little dry milk powder (this helps make it a little thicker).

Heat all 8 cups of milk in your crock pot on low for 2 1/2 hours.  Turn it off for 3 hours, leaving the lid on.  Take 2 cups of warmed milk, whisk in 1/2 cup yogurt, then return this mixture to the crock pot.  Put the lid back on, cover the whole crock pot with a big towel, and let it sit overnight.  By morning this will be yogurt.  Reserve 1/2 cup of this yogurt for your starter to make it next time.
My family likes thicker yogurt than this, so I strain it through paper coffee filters for a few hours in the fridge.  It takes about 4 filters full to get through the whole batch, so I have 2 going at once.  Strained, this recipe makes a quart of yogurt.

If you're into making smoothies, I think the thinner yogurt would be perfect for smoothie making.  We eat this nearly daily with blueberries and cereal (or homemade granola if we have some in the house).